 Herder
MIDI Host Herder
Use your iPhone to connect your keyboards and synths.
Herder is a free USB MIDI host and router for iPhone. Plug keyboards, pads and synths into a USB hub on your iPhone, and Herder routes MIDI between them. It can split and layer keyboards, remap controls, send MIDI clock and save your setups as presets.
Herder needs an iPhone with iOS 17 or later. Herder is free. There is no account, no advertising and no tracking. To get new versions before they reach the App Store, join the beta. The beta page lists what is new in the beta.
Why Herder
It replaces a hardware MIDI host box#
The iPhone you already carry connects your gear, and Herder passes MIDI between the devices.
No account, no cloud, no ads#
Your settings and presets stay on the phone. If you want a backup, you can export your presets as files.
Made for playing live#
The controls are large, and every screen has a PANIC button. Routing keeps running when the screen is locked.
What you need
An iPhone with iOS 17 or later#
Herder runs on iOS 17 and later. On iOS 26 and later, the app uses the Liquid Glass look.
A USB hub or adapter#
On iPhone 15 or newer, which has USB‑C, use a USB‑C hub. A powered hub is the best choice. On older iPhones with a Lightning port, use Apple's Lightning to USB 3 Camera Adapter with a powered hub.
Class-compliant USB MIDI devices#
Your USB devices must be class compliant, which means they work without a driver. You cannot install drivers on iOS. Nearly everything made since about 2010 is class compliant. Bluetooth MIDI and Network MIDI also work, and so do other music apps on the phone.
Cables that carry data#
Use good data cables. Many USB‑C cables only charge and do not carry data.
Features
Routing Send any input to any outputs. A routing can have several inputs and several outputs, and you can make as many routings as you like.
Quick route Tap an input, then tap an output. Herder makes the routing.
Route everything to everything One tap sends every input to every output, so the phone works as a MIDI thru box.
Filters and transforms Each routing has its own chain of steps, and the steps can be in any order. The steps are message filter, channel filter, channel remap, key range (splits), velocity range (layers), transpose, note map (drum remaps), velocity curve, controller remap, controller filter and clock divider.
Controller remap Turn any knob, fader, pad, pitch bend or aftertouch into any other control, or into a program change. The modes are Direct, Latch (toggle), Increment and Relative (for endless encoders), and each mapping can use a value curve.
MIDI Learn Throughout the app, MIDI Learn lets you move a control on your device instead of typing its number.
Conditions A routing can pass MIDI only while a condition is met, for example while a footswitch is held or a knob is above a value. The condition can come from any device.
MIDI clock Herder has an internal MIDI clock that is scheduled with precise timestamps, so its timing is steady. It has tap tempo and buttons that raise or lower the BPM, and it shows the tempo of clock that comes in from another device.
Monitor The monitor shows everything that comes in and goes out, live and in readable text. You can filter the list and switch to a hex view.
Presets You can make as many presets as you want, and they save automatically. Switch presets with a tap, with a program change from your controller, or with a pad or footswitch. When a preset loads, it can send program changes and SysEx to your synths.
Remote control Map pads, footswitches and knobs to actions: next or previous preset, clock start and stop, tap tempo, set BPM, panic, and turning routings on and off.
Panic on every screen PANIC sends All Notes Off, All Sound Off, reset controllers, sustain off and pitch bend centre on all channels of all outputs. The optional Hard panic also sends a separate note-off for every note.
Stuck-note protection Herder releases held notes when a routing is turned off, edited or deleted, or when it loses its condition. It also releases them when the routing's keyboard is unplugged in the middle of a chord.
Hot-plug Devices appear and disappear as you plug and unplug them. Routings remember their devices and reconnect them by name.
Runs in the background Routing keeps running when Herder is in the background and when the screen is locked.
How it works
- Plug your hub into the iPhone, and plug your gear into the hub.
- Open Herder. Your devices appear on the Devices tab, and each one has an LED that blinks when it sends MIDI.
- Tap an input, then tap an output, and play.
User manual#
The chapters below are in reading order. If something is not working, go to Troubleshooting. If notes are stuck, press PANIC and read the Panic chapter.
Contents
The screens#
Herder has five tabs at the bottom of the screen: Devices, Routings, Clock, Monitor and Presets. Every screen has a red PANIC button at the top right. You open Settings from the Presets tab.
Devices#
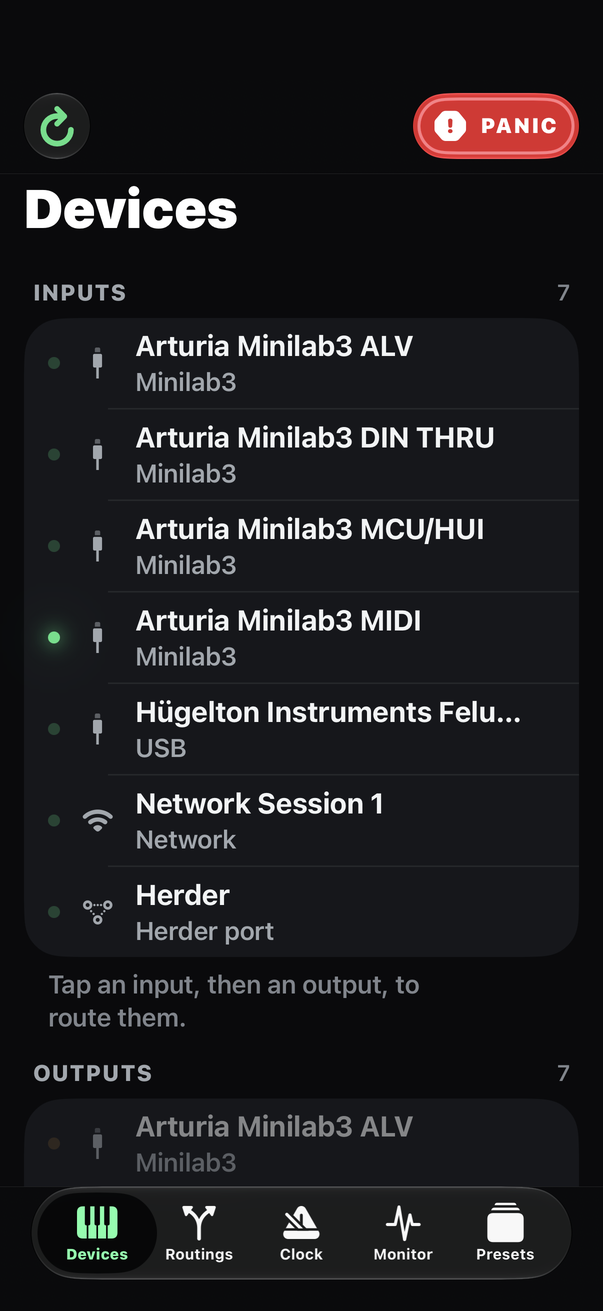
The Devices tab lists every MIDI Input and Output. Inputs are things that send MIDI, such as keyboards, pads, controllers and other apps. Outputs are things that receive MIDI, such as synths, drum machines and other apps.
Each row has an LED that blinks when that port carries MIDI. The row also shows an icon for the connection type (USB, Bluetooth, Network, App or Herder port) and the device name.
- Quick route: tap an input. The list changes to "Tap an output". Tap the output. Herder creates a routing and shows a confirmation. If that exact routing already exists, Herder tells you and does not make a copy.
- Route everything to everything: this makes one routing from every input to every output, like a hardware thru box. If you tap it again, Herder updates that routing to the devices that are plugged in at that moment.
- Bluetooth MIDI opens the iOS pairing sheet for BLE MIDI devices. Many small synths and controllers are BLE MIDI devices.
- Network MIDI is a switch that turns on the Network MIDI session of iOS. Computers on the same Wi‑Fi network can then send MIDI to Herder and receive MIDI from it.
- Refresh (the circular arrow) scans for devices again. You will rarely need it, because devices appear on their own.
A device with several ports shows each port as a separate row. For example, an Arturia MiniLab 3 appears as "Minilab3 MIDI" (keys, pads and knobs), "Minilab3 DIN THRU", "Minilab3 MCU/HUI" and "Minilab3 ALV". For playing, use the port named MIDI.
The port named "Herder" is the app's own virtual port. Other music apps, such as AUM, a DAW or synth apps, can send MIDI to it and receive MIDI from it. This means Herder can pass MIDI between apps and hardware. "Network Session 1" is the built-in Network MIDI port of iOS.
Herder creates the "Herder" port by default. In Devices → Virtual ports you can add more named ports and remove them. Each port is both an input and an output. You cannot rename a port. Virtual ports belong to the preset, so different presets can offer different ports to other apps.
Routings#
A routing is a virtual MIDI cable. What its inputs play goes to its outputs, and the routing can change the MIDI on the way.
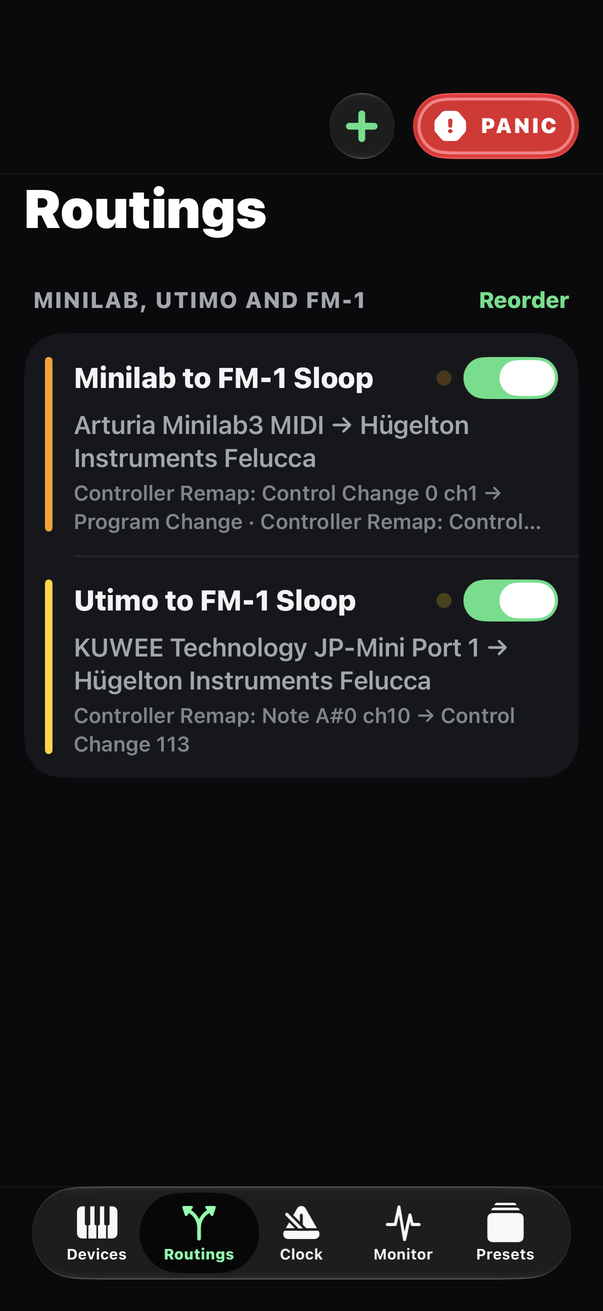
The Routings tab lists each routing with its colour, its inputs and outputs (shown as inputs → outputs), an LED and an on/off switch. Tap Reorder to change the order or to delete routings. If a routing's device is unplugged, the routing shows a warning that names the device, for example "… not connected". It starts working again when the device comes back.
Routing editor#
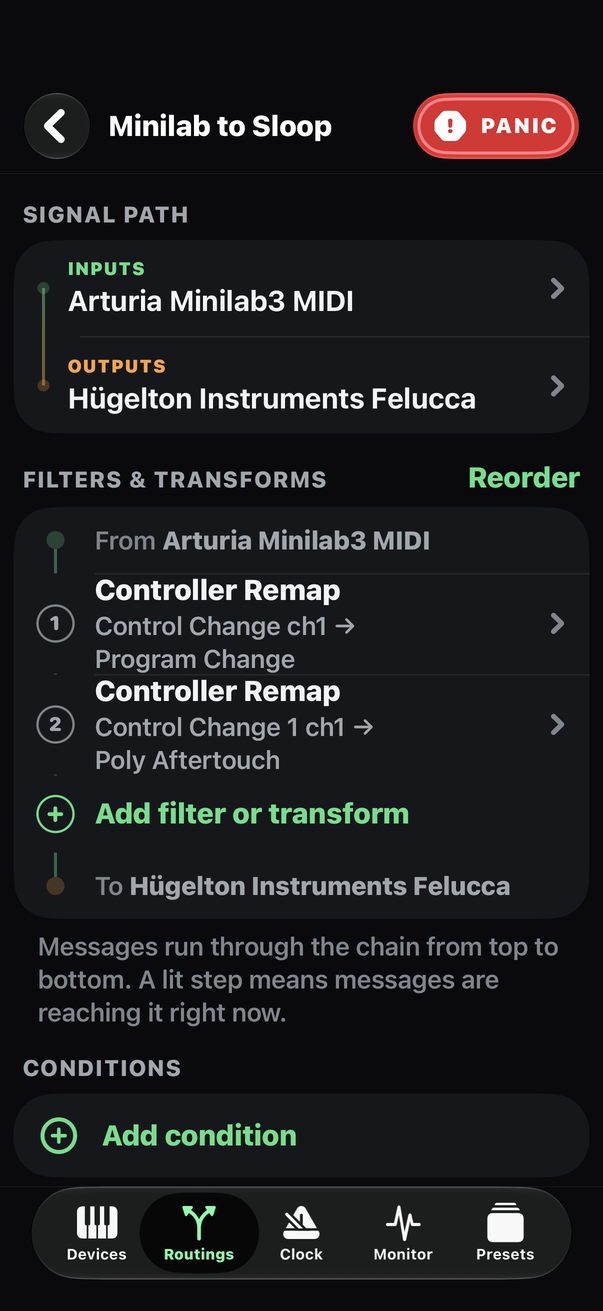
Open a routing to edit it. The editor has these parts:
- Name, Enabled and Colour set the routing's name, whether the routing is on, and its colour in the list.
- Inputs and Outputs: pick one or more ports for each.
- Filters & transforms shows the chain: From → steps → To. The steps run from top to bottom. Each step lights up when messages reach it, so you can see where a message is filtered out.
- Add filter or transform adds a step. Tap a step to edit it. To delete a step, open it and tap Delete step, or long-press the step in the chain. Reorder changes the order of the steps.
- Conditions: Add condition makes the routing pass MIDI only while a control is within a range, for example "Sustain pedal (CC 64) from 64 to 127". A condition can watch any device, not only the routing's own inputs. When a condition turns off, Herder releases the notes that are still held.
- Delete routing is at the bottom of the editor. Herder asks you before it deletes the routing.
Filters and transforms#
Each step in the chain does one job. You can add these steps in any order.
| Step | What it does | Typical use |
|---|---|---|
| Message filter | Lets only the message types you choose pass: notes, CC, program change, pitch bend, aftertouch, SysEx, clock, transport and others. | Stop clock or program changes from reaching a synth. |
| Channel filter | Passes only the MIDI channels you choose. | Listen to one part of a multitrack sequencer. |
| Channel remap | Moves everything to one channel, or remaps each channel separately. | A keyboard on channel 1 plays a synth on channel 2. |
| Key range | Passes only the notes between two keys. | Keyboard splits, with bass on the left and lead on the right. |
| Velocity range | Passes only the notes within a velocity range. | Velocity layers, with soft notes going to one synth and hard notes to another. |
| Transpose | Shifts notes by semitones (±48). | One octave up, or a change of key. |
| Note map | Maps single notes to other notes. | Remap drum pads to the note layout of a drum machine. |
| Velocity curve | Uses a linear range, a curve, a fixed velocity, or a 128-step table. | Make a stiff keyboard feel softer, or set every note to velocity 100. |
| Controller remap | Turns one control into another. See Controller remap below. | Map MiniLab knobs to a synth's filter and effects. |
| Controller filter | Blocks the CC numbers you choose. | Keep a controller's mod wheel from reaching a synth. |
| Clock divider | Passes 1 of every N clock ticks of clock that comes from a connected device. It stays in sync with Start and Song Position messages. It does not change Herder's own clock. | Half-time or quarter-time of an external sequencer's clock, for a drum machine. |
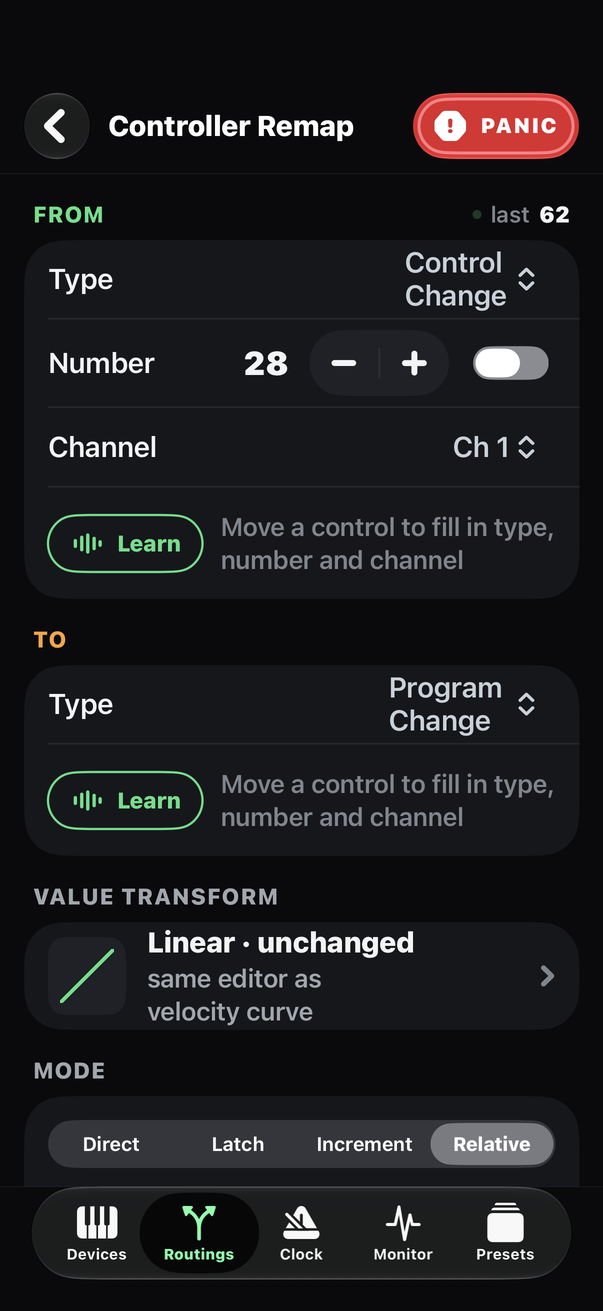
Controller remap#
A Controller remap step has these settings:
- From is the control that comes in. Tap Learn and move the control. You can also choose the type (Control change, Note, Pitch bend, Channel pressure, Poly pressure or Program change) and the number. Any matches every number.
- To is what the control becomes. This can be any CC number, a note, pitch bend, aftertouch or Program change.
- Value transform sets how the values are mapped. The value can be straight, inverted, curved, limited to a range, or mapped by a table.
- Mode sets how the control behaves. There are four modes:
- With Direct, the output follows the control. Use it for knobs and faders.
- With Latch (toggle), each press switches between off and on. This turns a momentary pad into an on/off switch.
- With Increment, each press raises the value by Step. Use it to cycle through programs with one pad.
- Relative is for endless encoders that send "64 ± n" for each click, such as the relative modes of Arturia, Novation and Akai controllers. Each click moves the value up or down by Step. Use this mode for an encoder that selects presets.
- Increment and Relative both have a Wrap switch, which is on by default. With Wrap on, the value goes back to 0 after 127. With Wrap off, the value stops at 127.
- Output channel: send on the same channel as the input, or on a fixed channel.
Clock#
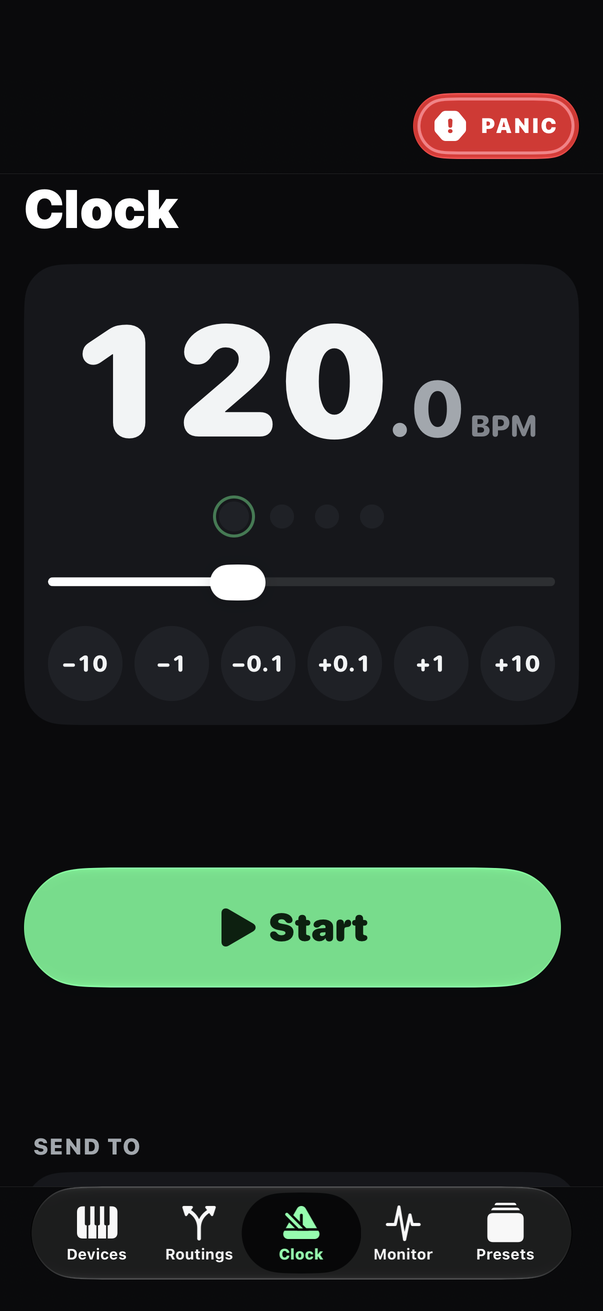
The Clock tab is an internal MIDI clock with 24 pulses per quarter note. Herder schedules each pulse with a precise timestamp, so the clock stays steady even when the phone is busy.
- A large BPM readout and a slider show and set the tempo. Buttons change it by −10, −1, −0.1, +0.1, +1 or +10. Hold a button to repeat it.
- Start/Stop starts and stops the clock. Tap tempo sets the tempo from your taps.
- Send to: choose which outputs receive the clock. Herder's own clock goes straight to these outputs. It does not pass through routings, so routing steps do not change it.
- There are two options for transport: Send Start / Stop, and Start when preset loads.
- Incoming shows the tempo of clock that comes from another device, and whether that clock is running. Use as internal tempo sets Herder's tempo to the incoming tempo.
Herder saves the tempo, the outputs and these options in each preset.
Monitor#
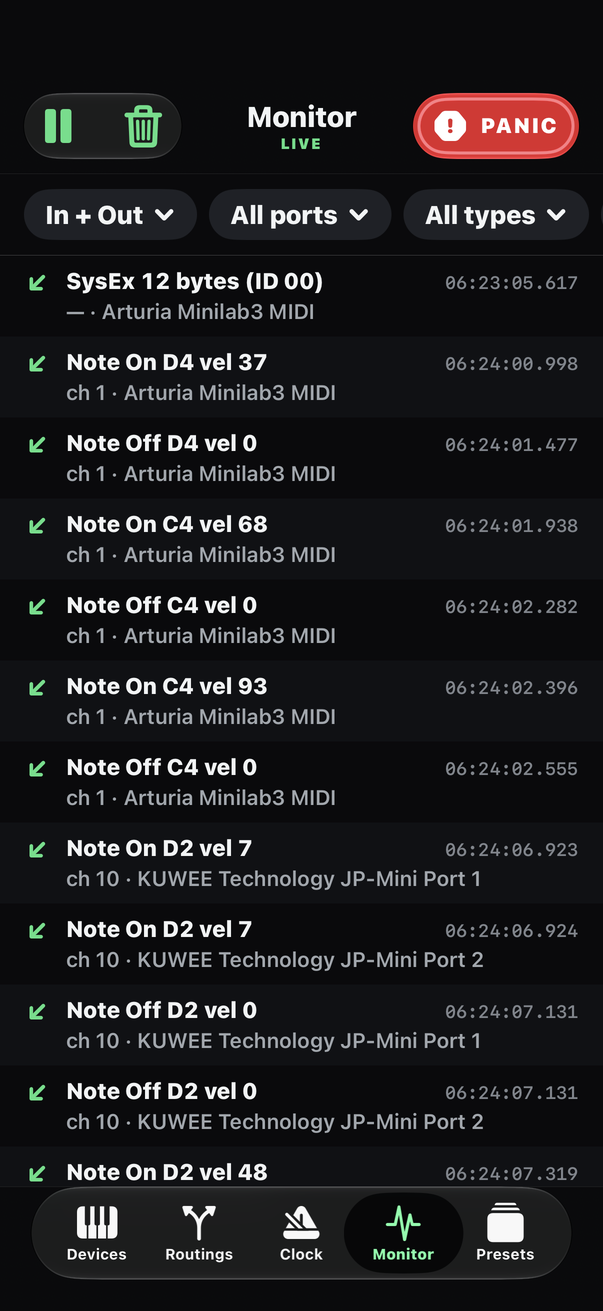
The Monitor tab is a live log of every message that comes in and goes out. The messages are written in plain language, for example "Note On C4 vel 100" or "CC 74 Brightness 63". Each row shows the time, the direction and the port. For outputs, the row also shows which routing sent the message. When a control moves fast, its messages are combined into one row with a count.
- You can filter the log by direction (In/Out), by a single port, and by message type.
- Hex shows the raw bytes. Clock shows clock ticks, which are hidden by default. Follow keeps the newest row in view.
- Pause stops the view from updating, but Herder keeps recording. Tap the bar that says "N new · Resume" to go back to the live log. Clear empties the log.
- You set how many rows are kept in Settings → Monitor options.
Presets#
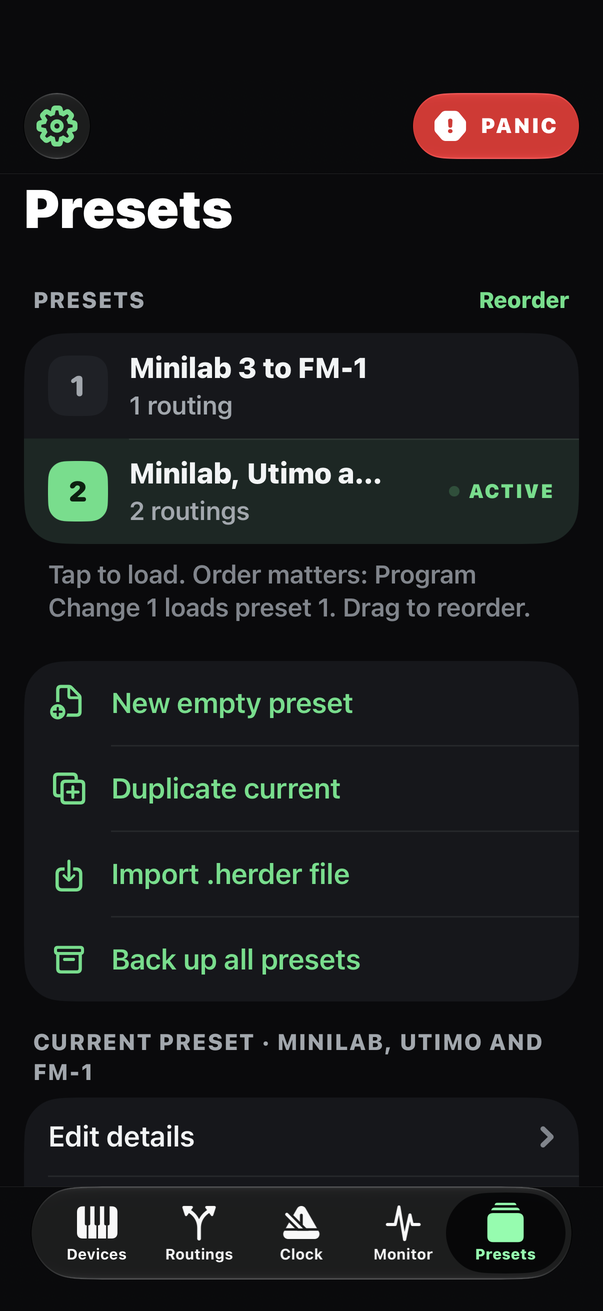
A preset is a complete setup. It contains the routings, the clock settings, the remote-control mappings, the send-on-load messages and Herder's virtual ports. Everything saves automatically.
- Tap a preset to load it. New empty preset adds a preset, and Duplicate current copies the preset that is loaded. You can also rename, reorder and delete presets.
- To select presets with program changes, use the global setting Program change selects preset in Settings. Choose Off, Any channel, or one channel from Ch 1 to Ch 16. A program change on that channel loads preset 1, 2, 3 and so on, in the order of the list. Program 1 loads the first preset (MIDI value 0, if your device counts from 0).
- Send on load: for each output, you can set messages that Herder sends whenever this preset loads. These can be program changes, control changes, or raw bytes / SysEx typed in hex (for example
F0 7E 7F 09 01 F7). Use it to set every synth to the right sound with one tap. - Remote control: map a pad, footswitch, key or knob to an action. Use Learn to pick the control. The actions are: select a specific preset, next / previous preset, clock start / stop / toggle, tap tempo, set BPM (with a knob), panic, and toggle / enable / disable a routing. Mappings belong to a preset. If you want a mapping in every preset, for example a footswitch for Next preset, make it once and then create the other presets with Duplicate current, which copies the mappings.
- Export / import: share one preset or the whole library as a
.herderfile through Files, AirDrop or iCloud Drive. Back up all presets saves the whole library, and Import .herder file brings presets in. A.herderfile is plain JSON. Importing always adds the presets to your library. It never replaces anything. Opening a.herderfile from Files or AirDrop imports it in the same way.
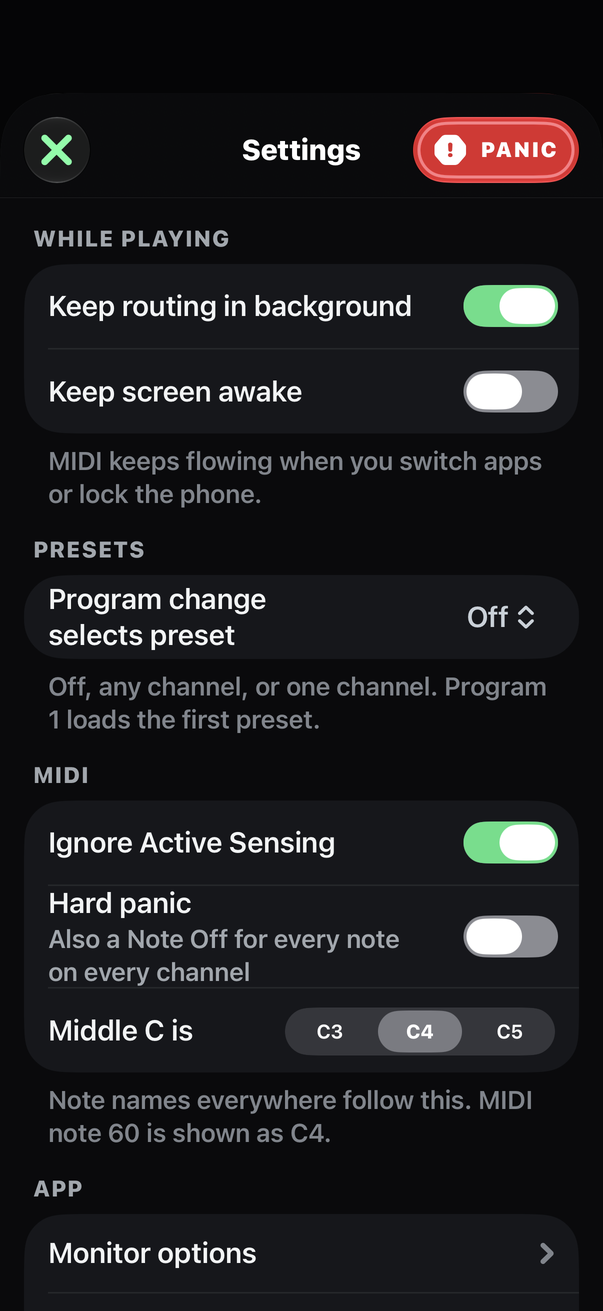
Settings#
You open Settings from the Presets tab.
- Keep routing in background keeps MIDI routing running when the screen is locked or while you use another app. It uses a silent audio session. This setting is on by default.
- Keep screen awake keeps the screen on while Herder is open.
- Program change selects preset: Off, Any channel, or one channel from Ch 1 to Ch 16. Program 1 loads the first preset. See Presets.
- MIDI: Ignore Active Sensing is on by default. Hard panic also sends every note-off on every channel. Middle C is sets how note names are shown: C3, C4 or C5. The default is C4.
- Monitor options let you choose whether to show clock ticks, active sensing and hex bytes, and how many rows to keep (the last N rows).
- There is also a Haptics setting.
- About shows the version and has a link to this page.
Panic#
The red PANIC button is on every screen. It sends these messages to every output, on all 16 channels: All Sound Off, All Notes Off, Reset All Controllers, sustain off and pitch bend centre. Before it sends them, Herder releases the notes it knows are held.
If Hard panic is turned on in Settings, PANIC also sends a note-off for every note. The button acts as soon as you touch it.
Recipes#
Play a synth from a keyboard#
- Open the Devices tab.
- Tap the keyboard. For a MiniLab 3, tap "Minilab3 MIDI".
- Tap the synth.
If the synth stays silent, set the synth to receive on the keyboard's channel. The MiniLab 3 sends on channel 1. You can also add a Channel remap step to the routing.
Map controller knobs to synth parameters#
- Open the routing.
- Tap Add filter or transform and choose Controller remap.
- At From, tap Learn and turn the knob.
- At To, choose Control change and enter the synth's CC number.
- If the synth listens for these CCs on another channel, set Output channel. For example, the M‑VAVE FM‑1 takes effect CCs 70–93 on channel 2.
- Go back.
Add one Controller remap step for each knob.
Select synth presets from the controller#
- Add a Controller remap step to the routing.
- At From, tap Learn and turn the knob or encoder.
- At To, choose Program change.
- At Mode, choose Direct for a plain knob. For an endless encoder, choose Relative, so that each click moves one preset.
An endless encoder is a control that sends values like 61–67 around 64.
Split a keyboard between two synths#
- Make two routings from the same keyboard, each to a different synth.
- Add a Key range step to each routing, for example C1–B2 in the first and C3–C7 in the second.
- If you want to shift the notes, add a Transpose step.
Velocity layers#
- Make two routings with the same input, each to a different synth.
- Add a Velocity range step to each routing: 1–90 in one and 91–127 in the other.
Soft notes then play one synth, and hard notes play the other.
Play a layer only while a pedal is held down#
- Make a routing to a pad synth.
- Tap Add condition and set the condition to "Sustain pedal (CC 64) 64–127".
The layer plays only while the pedal is down.
Remap drum pads#
- Add a Note map step to the routing.
- Map each of your pad notes to the note your drum machine expects.
Send clock to a drum machine#
- Open the Clock tab.
- At Send to, choose the drum machine.
- Start the clock with Start/Stop.
For half-time, halve the BPM. A Clock divider step does not help here, because Herder's own clock goes straight to the outputs and does not pass through routings. Clock divider steps work on clock that comes from another device, for example a sequencer that you route through Herder to the drum machine.
Change your whole setup with one footswitch#
- In the first preset, add a Remote control mapping, and map your footswitch to Next preset.
- In the same preset, use Send on load to send a program change to every synth.
- Create the other presets with Duplicate current, so that each one has the footswitch mapping. Then change their sounds.
Each press of the footswitch loads the next preset, and the preset sends program changes to every synth.
If your controller sends program changes, you can use Program change selects preset in Settings instead. That setting works for all presets and needs no mapping.
Use Herder with music apps#
- In AUM or a DAW, set a track's MIDI output to "Herder".
- In Herder, route the "Herder" input to your hardware.
You can also send MIDI in the other direction. Route your hardware to the "Herder" output in Herder, and use "Herder" as the MIDI input in the other app.
Troubleshooting#
My device does not appear#
Try these steps in order.
- Try another cable. Many USB‑C cables carry power only. This is the most common cause.
- Use a powered hub. iPhones supply little power, and synths with USB audio draw more power than keyboards.
- Plug the device straight into the iPhone. This tells you whether the hub is the problem.
- Unlock the phone before you plug in the device. In the iOS Settings app, open Face ID & Passcode (Touch ID & Passcode on iPhone SE) and check that Accessories is allowed.
- Check that the device is class compliant. If it needs a driver on a computer, it will not work over USB on iOS. Use its Bluetooth MIDI instead, or connect it through a USB MIDI interface with 5-pin DIN.
- Try a free MIDI monitor app. If that app does not see the device either, iOS is not seeing it, and no app can use it.
One device shows up several times#
A device with several ports lists each port separately. For playing, pick the port named "MIDI".
Notes are stuck#
Press PANIC. If a synth ignores All Notes Off, turn on Hard panic in Settings.
The synth does not respond#
Check which MIDI channel the synth receives on. Then open the Monitor tab. If the output rows for the synth are there, Herder is sending, and the problem is on the synth's side.
A knob mapped to program change jumps between presets or reaches only a few of them#
The control is an endless encoder that sends relative values. Set the Controller remap mode to Relative.
In Relative mode, Herder counts from preset 0 when the app starts. So the first click selects preset 1, whatever the synth shows at that moment.
Routing stops when the screen locks#
Turn on Keep routing in background in Settings.
The clock drifts or is uneven on the receiving device#
Make sure the device receives clock from only one source. To block clock in your other routings, add a Message filter step to them.
Something else is wrong#
If your problem is not on this list, describe it on the Herder feedback page.
Frequently asked questions#
Is it free?#
Yes. There is no account, no advertising and no in-app purchase.
What data does Herder collect?#
None. Your settings and presets are stored only on your phone. Files you export are yours. The privacy policy has the details.
Does it work with iPhones that have a Lightning port?#
Yes. Use Apple's Lightning to USB 3 Camera Adapter with a powered hub.
Does it work on iPad?#
Herder is made for iPhone and has not been tested on iPad.
Does it support Bluetooth MIDI?#
Yes. Bluetooth MIDI devices work as inputs and outputs, together with USB devices.
Can other apps use Herder?#
Yes, through Herder's virtual port. Other apps see it as "Herder".
What about latency?#
Herder routes each message the moment it arrives. It does not buffer messages; it sends each one straight on.
Can I try new versions before they reach the App Store?#
Yes. Before you join, use Back up all presets on the Presets screen and keep the file. You need it only if you go back to the App Store version later. Then install Apple's free TestFlight app, and open the Herder beta invitation on your iPhone. TestFlight installs the beta in place of the App Store version, and your settings and presets stay. A beta can have new bugs.
The Herder beta page lists what is new in the current beta, and explains how to send feedback and how to go back to the App Store version.
Where do I report bugs or send feedback?#
Use the Herder feedback page.